
Hello again! So, right after publishing the part 1 of this three-part tutorial series, it became extremely well-received and known by people (mostly the LÖVE Forums community and the Stabyourself Forums community). In less than a week, it already became the most visualized post of my whole blog! This was great, and I'm really, really, thankful to all of your kindness. It makes me really glad that I'm helping you all! I was going to take a little more of time until the part 2 release, but seeing that people enjoyed these tutorials, I'm already working on this!
As for how long it took me to release the part 2, I'm really, really sorry: I've got a new computer, so I had to transfer the tutorial's files AND install a bunch of programs. But don't worry: this won't happen to part 3...
If you'd like to see more about the LÖVE Forums' post for this tutorial, just CLICK HERE!
Now, without further ado, let's get to the little details of a 2D physics engine: gravity, friction, speed, masks, collision worlds, dynamic status and other little object-specified or global variables and concepts! Since they're mostly simple to explain, I'm putting them all in this single tutorial, instead of making a single tutorial for the topic, like in part 1. Ready?
This is the part 2 of a 3-part tutorial.
Part 1: Collision detection/handling;
> Part 2: Gravity, friction, speed, masks and other global/local concepts;
Part 3: Drawing objects and optimizing your engine.
So click on "Read more" to go to the tutorial!
So, now that we've got objects positioning, dimensions and collisions mostly done, we should get something else that is essential to objects: movement. Even though we can create movements for objects pretty easily (as shown in an example from the first tutorial), but when it gets to multiple, independently-moving objects, things can get a bit (or a lot) messy. To make up with that, we can set up a very simple way of handling objects' speeds. Remember how in the last tutorial we set up a class for an object, so we could handle functions and variables very easily? Well, I didn't got deeper into that because it wasn't exactly part of the collision-handling system, but more of variable-setting and optimization.
Setting up an object's speed
Setting up functions in objects makes it so you don't need to calculate similar variables for every object, nor make it in a hard-to-understand way. In the last tutorial, I showcased my two favorite methods of easy object creation: by function call and by classes. So let's get to how we'd set the speed variables (and any other variables related to the object) inside objects like the ones shown in the last tutorial:
Based on the last tutorial's methods of object creation, it should still be easy to understand how to add these variables to your objects. Unless you're making an object that is already created in motion, all objects should start with their speeds as 0 and 0. The reason why we do this is that, this way, we already define the speed variable and can later set them without having to create them again.
Setting up the speed is easy. Now we just have to make it have an influence over the object!
First of all: we want to make the object move based on it's speed, so we have to understand what each speed does to the object:
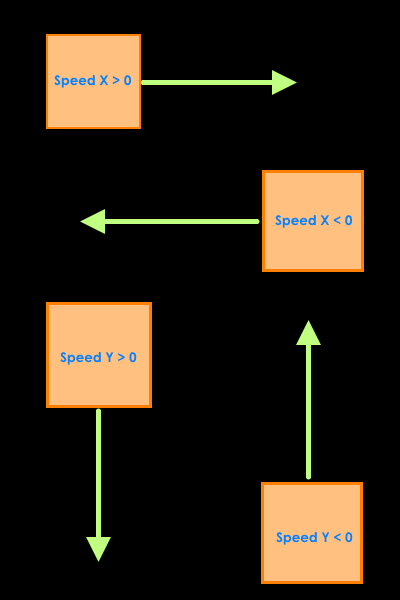
Of course, you can (and you WILL) combine both speed axis to make the object move diagonally. But the speed itself won't make the object move: when we're drawing it, we're using the x and y variables, right? So, how to convert speed into position?
The best way to do it is by using dt again. Remember it from the last tutorial? It's what we used for the physics.update function. In resume: if you add dt to a variable with the value of 0 in every update call, after one second this variable will be 1, in two seconds, 2, etc. This variable is used to keep track of time, and isn't it what speed is about? Distance moved in a certain amount of time? So, we just have to move the object for a distance N (which is the value described in the object's speed) for a single second. So basically you're just setting the distance for the object to travel in a single second, or unities per second. It may sound complicated, but it's very, very simple!
See? That's all we need! You can set this on the general physics call, instead of doing it per object. This way you make your code more organized and you have less repetitive code to do!
So, on your physics_update function, just set the object's position right after the collision! This is not a rule, you can still set this before, you can experiment with it and see which options suits your needs better!
You're mostly done with the speed, but there are some extra things you can do to improve it:
1. Setting up a maximum speed
This is something good to set up because later, when we set things like gravity, for example, speeds can grow up without control and, even though it wouldn't "break" anything within your game, it'd make objects pass straight through walls or simply go so fast that you can barely control/stop them. So having a limit speed helps you have a bit more control over your object. Plus, it doesn't become overly noticeable, so having a speed limit won't make your objects act unnaturally. Here's the simplest way of doing it:
Just to clear up things: I'm doing "math.max" between the object's speed and the negative maximum speed (which would be the maximum speed for going backwards). When doing "math.max", we're getting the biggest value between the speed and the negative maximum speed, so if the speed is lower than the negative maximum speed it'll automatically take the negative maximum speed. As for "math.min", we're checking which one is smaller: the object's speed and the maximum speed. So, if the object's speed is bigger than the maximum speed, it'll be automatically set up to the maximum speed.
In resume: it'll "filter" the object speed, so it is always smaller than the maximum speed.
There's a flaw with this method, though, which is the fact that, if you're moving in the maximum speed both horizontally and vertically, your diagonal speed will be higher than the maximum speed. But a friendly user from the Löve Forums, Ivan, came up with a quick and clever solution for this:
2. Stable delta time
This snippet does not only applies to setting up the object's speed, but for any update call you may have in your code. But we'll discuss this deeper in the next tutorial. Basically: set the delta time to have a maximum value (say, 1/60, which would be like one frame of a 60fps animation).
This is great because if your game somehow gets lag (or simply goes slower for some reason), your object will not "teleport" between two points. Why this happens, you may ask: when your framerate is smooth and your computer fast, your delta time will be either 1/60 or less (considering your games run on 60fps, and not 30fps). BUT, if you get lag, it'll be changed to a bigger values (sometimes even half a second, which is a lot in terms of framerate: it'd be 2 frames per second). The game does this to compensate the loss on your framerate, so you'd still get the same values as you'd have without the lag. But this makes your game flicker around, and if one object is moving smoothly, it'll make a huge "jump" in the middle of it's path. To avoid that, we can simply make the delta time have a maximum value, much like in the example above with speeds:
This will make the game seem slower in case of lag, but you'll be just making it smoother. The fault is still in the lag...
3. Resetting speed on collision
This is not something required (if you have maximum speed), but even with that it's VERY recommended that you reset your speed after a collision. This way, if your object have to move over a surface, it won't mess up anything. Or, if your object (the player, for example) have to jump, it doesn't affects it. Resetting speed on collision is so simple that you just need this:
And, if you think that you'll need to reset the second colliding object speed, you can just copy the two speed resetting line, paste it right below each and replace "obj1" with "obj2".
Setting up gravity
Now that we've got the speed done, we can jump to it's close friend: gravity. Doing gravity is really easy when you have the speed variables set up: all you need to do is add up to the object's speed Y, so, even if your object is moving up, it'll slow down and fall a little later. The good thing about gravity is that you can set it as a global variable, so you don't need to calculate it for every objects. BUT, if your game requires, you're still able to set it independently. Let's take a look at the best way of doing it:
Setting up friction
If you thought setting up gravity was hard, you may be perplex about how simple it was. That's the charm of having speed variables: they make things easier! And YES, it applies to friction too!
You can have two types of friction, to guarantee that your object will not move endlessly through your game (unless it is set up in space).
The first one: air friction.
Setting air friction is as simple (if not simpler) as gravity:
And yes: if you ever need, you can also have custom air friction per object. This is great if you have huge objects, so they can fall/move slightly slower, looking more realistic!
Setting up surface friction
Setting up surface friction is also very easy, but it requires a bit more of specification: unless you want to have the same friction effect for every surface, you'll have to specify what collisions have certain frictions and what collisions have others. You can set it either in the physics_update function or individually per object. In the next tutorial we'll talk about custom side collision functions per object, so you'll be able to set that there too. For surface friction, you'll have to calculate it inside the objects loops, so you can be sure that the objects collided to later set the friction effects.
The cool thing about surface friction is that it is VERY flexible. For example: if you want your player to move through water, you'll most likely want it to fall a bit slower than in air, but even more slower when moving horizontally. So you can have something like this:
Collision masks
Differently from what people may think, collision masks are very easy to set up. You're probably thinking about how things related to physics are far more simple than we ever thought, and that's usually the case for most details about it. Collision masks are NOT required, but if you have a more advanced game where you need certain objects to collide ONLY with a said group of objects, or another object to collide with everything BUT some objects, then you'll want to add collision masks.
There are several ways of doing this, you're free to look up after them on the internet (or by looking at some game's source; I really recommend looking at Mari0's code, I learned a lot of things from there). The way I'm going to show this is the way *I* set up this, and I personally think it is much easier to understand, set up and, mostly, read. That's why organizing your code is important: if someone need to look up after something in a certain part of your code (maybe even you!), it'll be better if you can read it more easily. I've seen some collision masks examples almost impossible to understand, so I came up with my own method:

You can have my method or come up with your own. Most masks I've seen only take into consideration objects to filter, never to ignore. So if you want a certain object to collide with everything BUT object N, you'll have to list all the objects and leave object N off.
Another thing about masks that I've seen is that they're mostly not "readable": they often use "codes", or numeric values to represent objects, so you always have to check the object's id for every mask.
My method not only is easier to read/reproduce, but is also very simple to put into action: since in this case we're using bidimensional tables (which means the object will have a name - for example, "box" - and an id - for example, 3), we can set up the objects names and filter them without making any id conversion!
Just one thing, though: for this function (and some others ahead), I'll be using a function that's not present in the Lua source, but that I made myself. It's really small and simple, and it's really useful, so we can avoid doing "for" loops every time we need to find an entry within a table. I got inspiration from a similar function I saw in Mari0's source code, but I adapted it a bit:
And now to our mask-detecting function:
From that, we can very easily add this to our physics_update function!
And that's all you'll need for masks. Wasn't hard to understand, was it?
Collision worlds
Collision worlds are a part of physics in games that is rarely used. Unless you have a big game with several things happening at the same time or if your game involves multiple layers that shouldn't interact with each other, you will not need this. But, since I'm here to show you what you can do, I decided I should also explain collision worlds.
Collision worlds are, on it's root, wider masks. They're used for when you have the same types of objects splitted in several layers, dimensions or worlds. This way, you can have the same objects colliding as they would (using masks) in two different spaces, in a way that you don't need to make several copies of objects to get new masks and that they don't interfere with each other unless you force it to happen.
The way I came up with it was also pretty simple: you "create" worlds by simply adding them to a certain object: you can have strings, numbers or even a table, for having objects that affect two or more worlds at the same time.
Those are types of worlds you can have:
But, even though they're not often used, collision worlds are not hard to understand: just think of them as a "large mask" that contains several of our already in-use masks. They're very easy to set up (just a single variable per object) and they're also very simple to be detected!
It may look a bit complicated, but it isn't: if it weren't by checking similarities between tables (in case you want an object to affect two or more worlds), this code would be even smaller and simpler! I'm just giving you the keys, so you can mold it in your game however you feel like! Now you just need to add this to the object elimination process, like you did with the masks!
Static objects
Making static objects is easier than you might think. Just like most object-related behaviors, all you'll need is a simple, single variable. After you added it, you just need to check, in your collision loop code, if the object you're looking at is static. If it is, you can ignore it while applying gravity, friction, speed, etc. Furthermore, if you already want to make your game run faster, you can simply ignore them completely! That's right, to make static objects work, just make the game pretend they're not there. This way, you won't calculate speed/friction/gravity by default, but you'll also not check collision detection. That's okay in this case, because, since a collision happens between 2 objects, if one doesn't answers it, the other will!
Conclusion
Once again, if you want to organize yourself a bit more, here's what your code should look like, more or less:
This was all there was for this tutorial, guys! I'm sorry that it took so long for me to release it, but, since I got a new computer, I had to set things up, transfer files from the old computer to this one (including the tutorial files), install programs again (including Notepad++ and Paint.NET, which I use in my tutorials) and a lot of other little tweaks. But don't worry: the next tutorial will come way faster!
Thank you all for reading and thank you so much for your feedback and compliments on the last tutorial, I really appreciate it! I hope I could help you! If you've got any doubt, suggestion, comment, criticism or question, please let me know in the comments of this post or in the LÖVE forums (link at the top of this post). And I see you guys in my next post!
So, now that we've got objects positioning, dimensions and collisions mostly done, we should get something else that is essential to objects: movement. Even though we can create movements for objects pretty easily (as shown in an example from the first tutorial), but when it gets to multiple, independently-moving objects, things can get a bit (or a lot) messy. To make up with that, we can set up a very simple way of handling objects' speeds. Remember how in the last tutorial we set up a class for an object, so we could handle functions and variables very easily? Well, I didn't got deeper into that because it wasn't exactly part of the collision-handling system, but more of variable-setting and optimization.
Setting up an object's speed
Setting up functions in objects makes it so you don't need to calculate similar variables for every object, nor make it in a hard-to-understand way. In the last tutorial, I showcased my two favorite methods of easy object creation: by function call and by classes. So let's get to how we'd set the speed variables (and any other variables related to the object) inside objects like the ones shown in the last tutorial:
|
|
Based on the last tutorial's methods of object creation, it should still be easy to understand how to add these variables to your objects. Unless you're making an object that is already created in motion, all objects should start with their speeds as 0 and 0. The reason why we do this is that, this way, we already define the speed variable and can later set them without having to create them again.
Setting up the speed is easy. Now we just have to make it have an influence over the object!
First of all: we want to make the object move based on it's speed, so we have to understand what each speed does to the object:
Of course, you can (and you WILL) combine both speed axis to make the object move diagonally. But the speed itself won't make the object move: when we're drawing it, we're using the x and y variables, right? So, how to convert speed into position?
The best way to do it is by using dt again. Remember it from the last tutorial? It's what we used for the physics.update function. In resume: if you add dt to a variable with the value of 0 in every update call, after one second this variable will be 1, in two seconds, 2, etc. This variable is used to keep track of time, and isn't it what speed is about? Distance moved in a certain amount of time? So, we just have to move the object for a distance N (which is the value described in the object's speed) for a single second. So basically you're just setting the distance for the object to travel in a single second, or unities per second. It may sound complicated, but it's very, very simple!
|
|
See? That's all we need! You can set this on the general physics call, instead of doing it per object. This way you make your code more organized and you have less repetitive code to do!
So, on your physics_update function, just set the object's position right after the collision! This is not a rule, you can still set this before, you can experiment with it and see which options suits your needs better!
|
|
You're mostly done with the speed, but there are some extra things you can do to improve it:
1. Setting up a maximum speed
This is something good to set up because later, when we set things like gravity, for example, speeds can grow up without control and, even though it wouldn't "break" anything within your game, it'd make objects pass straight through walls or simply go so fast that you can barely control/stop them. So having a limit speed helps you have a bit more control over your object. Plus, it doesn't become overly noticeable, so having a speed limit won't make your objects act unnaturally. Here's the simplest way of doing it:
|
|
Just to clear up things: I'm doing "math.max" between the object's speed and the negative maximum speed (which would be the maximum speed for going backwards). When doing "math.max", we're getting the biggest value between the speed and the negative maximum speed, so if the speed is lower than the negative maximum speed it'll automatically take the negative maximum speed. As for "math.min", we're checking which one is smaller: the object's speed and the maximum speed. So, if the object's speed is bigger than the maximum speed, it'll be automatically set up to the maximum speed.
In resume: it'll "filter" the object speed, so it is always smaller than the maximum speed.
There's a flaw with this method, though, which is the fact that, if you're moving in the maximum speed both horizontally and vertically, your diagonal speed will be higher than the maximum speed. But a friendly user from the Löve Forums, Ivan, came up with a quick and clever solution for this:
|
|
2. Stable delta time
This snippet does not only applies to setting up the object's speed, but for any update call you may have in your code. But we'll discuss this deeper in the next tutorial. Basically: set the delta time to have a maximum value (say, 1/60, which would be like one frame of a 60fps animation).
This is great because if your game somehow gets lag (or simply goes slower for some reason), your object will not "teleport" between two points. Why this happens, you may ask: when your framerate is smooth and your computer fast, your delta time will be either 1/60 or less (considering your games run on 60fps, and not 30fps). BUT, if you get lag, it'll be changed to a bigger values (sometimes even half a second, which is a lot in terms of framerate: it'd be 2 frames per second). The game does this to compensate the loss on your framerate, so you'd still get the same values as you'd have without the lag. But this makes your game flicker around, and if one object is moving smoothly, it'll make a huge "jump" in the middle of it's path. To avoid that, we can simply make the delta time have a maximum value, much like in the example above with speeds:
|
|
This will make the game seem slower in case of lag, but you'll be just making it smoother. The fault is still in the lag...
3. Resetting speed on collision
This is not something required (if you have maximum speed), but even with that it's VERY recommended that you reset your speed after a collision. This way, if your object have to move over a surface, it won't mess up anything. Or, if your object (the player, for example) have to jump, it doesn't affects it. Resetting speed on collision is so simple that you just need this:
|
|
And, if you think that you'll need to reset the second colliding object speed, you can just copy the two speed resetting line, paste it right below each and replace "obj1" with "obj2".
Setting up gravity
Now that we've got the speed done, we can jump to it's close friend: gravity. Doing gravity is really easy when you have the speed variables set up: all you need to do is add up to the object's speed Y, so, even if your object is moving up, it'll slow down and fall a little later. The good thing about gravity is that you can set it as a global variable, so you don't need to calculate it for every objects. BUT, if your game requires, you're still able to set it independently. Let's take a look at the best way of doing it:
|
|
Setting up friction
If you thought setting up gravity was hard, you may be perplex about how simple it was. That's the charm of having speed variables: they make things easier! And YES, it applies to friction too!
You can have two types of friction, to guarantee that your object will not move endlessly through your game (unless it is set up in space).
The first one: air friction.
Setting air friction is as simple (if not simpler) as gravity:
|
|
And yes: if you ever need, you can also have custom air friction per object. This is great if you have huge objects, so they can fall/move slightly slower, looking more realistic!
Setting up surface friction
Setting up surface friction is also very easy, but it requires a bit more of specification: unless you want to have the same friction effect for every surface, you'll have to specify what collisions have certain frictions and what collisions have others. You can set it either in the physics_update function or individually per object. In the next tutorial we'll talk about custom side collision functions per object, so you'll be able to set that there too. For surface friction, you'll have to calculate it inside the objects loops, so you can be sure that the objects collided to later set the friction effects.
|
|
The cool thing about surface friction is that it is VERY flexible. For example: if you want your player to move through water, you'll most likely want it to fall a bit slower than in air, but even more slower when moving horizontally. So you can have something like this:
|
|
Collision masks
Differently from what people may think, collision masks are very easy to set up. You're probably thinking about how things related to physics are far more simple than we ever thought, and that's usually the case for most details about it. Collision masks are NOT required, but if you have a more advanced game where you need certain objects to collide ONLY with a said group of objects, or another object to collide with everything BUT some objects, then you'll want to add collision masks.
There are several ways of doing this, you're free to look up after them on the internet (or by looking at some game's source; I really recommend looking at Mari0's code, I learned a lot of things from there). The way I'm going to show this is the way *I* set up this, and I personally think it is much easier to understand, set up and, mostly, read. That's why organizing your code is important: if someone need to look up after something in a certain part of your code (maybe even you!), it'll be better if you can read it more easily. I've seen some collision masks examples almost impossible to understand, so I came up with my own method:
You can have my method or come up with your own. Most masks I've seen only take into consideration objects to filter, never to ignore. So if you want a certain object to collide with everything BUT object N, you'll have to list all the objects and leave object N off.
Another thing about masks that I've seen is that they're mostly not "readable": they often use "codes", or numeric values to represent objects, so you always have to check the object's id for every mask.
My method not only is easier to read/reproduce, but is also very simple to put into action: since in this case we're using bidimensional tables (which means the object will have a name - for example, "box" - and an id - for example, 3), we can set up the objects names and filter them without making any id conversion!
Just one thing, though: for this function (and some others ahead), I'll be using a function that's not present in the Lua source, but that I made myself. It's really small and simple, and it's really useful, so we can avoid doing "for" loops every time we need to find an entry within a table. I got inspiration from a similar function I saw in Mari0's source code, but I adapted it a bit:
|
|
And now to our mask-detecting function:
|
|
From that, we can very easily add this to our physics_update function!
|
|
And that's all you'll need for masks. Wasn't hard to understand, was it?
Collision worlds
Collision worlds are a part of physics in games that is rarely used. Unless you have a big game with several things happening at the same time or if your game involves multiple layers that shouldn't interact with each other, you will not need this. But, since I'm here to show you what you can do, I decided I should also explain collision worlds.
Collision worlds are, on it's root, wider masks. They're used for when you have the same types of objects splitted in several layers, dimensions or worlds. This way, you can have the same objects colliding as they would (using masks) in two different spaces, in a way that you don't need to make several copies of objects to get new masks and that they don't interfere with each other unless you force it to happen.
The way I came up with it was also pretty simple: you "create" worlds by simply adding them to a certain object: you can have strings, numbers or even a table, for having objects that affect two or more worlds at the same time.
Those are types of worlds you can have:
|
|
But, even though they're not often used, collision worlds are not hard to understand: just think of them as a "large mask" that contains several of our already in-use masks. They're very easy to set up (just a single variable per object) and they're also very simple to be detected!
|
|
It may look a bit complicated, but it isn't: if it weren't by checking similarities between tables (in case you want an object to affect two or more worlds), this code would be even smaller and simpler! I'm just giving you the keys, so you can mold it in your game however you feel like! Now you just need to add this to the object elimination process, like you did with the masks!
Static objects
Making static objects is easier than you might think. Just like most object-related behaviors, all you'll need is a simple, single variable. After you added it, you just need to check, in your collision loop code, if the object you're looking at is static. If it is, you can ignore it while applying gravity, friction, speed, etc. Furthermore, if you already want to make your game run faster, you can simply ignore them completely! That's right, to make static objects work, just make the game pretend they're not there. This way, you won't calculate speed/friction/gravity by default, but you'll also not check collision detection. That's okay in this case, because, since a collision happens between 2 objects, if one doesn't answers it, the other will!
|
|
Conclusion
Once again, if you want to organize yourself a bit more, here's what your code should look like, more or less:
|
|
This was all there was for this tutorial, guys! I'm sorry that it took so long for me to release it, but, since I got a new computer, I had to set things up, transfer files from the old computer to this one (including the tutorial files), install programs again (including Notepad++ and Paint.NET, which I use in my tutorials) and a lot of other little tweaks. But don't worry: the next tutorial will come way faster!
Thank you all for reading and thank you so much for your feedback and compliments on the last tutorial, I really appreciate it! I hope I could help you! If you've got any doubt, suggestion, comment, criticism or question, please let me know in the comments of this post or in the LÖVE forums (link at the top of this post). And I see you guys in my next post!
No comments:
Post a Comment